Save Selection to Use Again Photoshp
Lesson 6: Saving Images
/en/photoshopbasics/bones-tasks-in-photoshop/content/
Introduction
In Photoshop, saving works a bit differently from most other applications. Instead of working with i master file type—similar .docx in Microsoft Give-and-take—Photoshop offers a diversity of ways to relieve your images. In this lesson, we'll cover the dissimilar saving options in Photoshop, along with some common reasons to save files in different formats.
If you'd like to follow along, you can download our example file.
Saving options
When saving a file in Photoshop, yous have several options and file formats to choose from:
- PSD: This is the default file type for Photoshop documents, although y'all won't necessarily employ it for every image. It will save your layers and all of the other information in your image then you tin easily re-edit information technology later. PSD files are designed to be opened in Photoshop, so if you desire to share the image with others you lot'll as well need to salve a copy of the image in a common file format, like JPEG.
- Common file formats: You tin save images in a multifariousness of common file types, including JPEG and PNG. These file formats can exist viewed and edited on almost any reckoner or mobile device, which makes them well-suited for sharing with others. However, unlike PSD files these formats aren't as useful if you plan to go along editing the file, and they also can't preserve layer information.
- Salve for Web: If you're planning to upload an image to the Web, like on a web log or website, you lot'll want to use the Relieve for Web characteristic. This tool allows you lot to save images that are optimized for the Web, which will make them easier to download and view online. Save for Spider web besides includes several helpful features for preparing images for the Web, including the pick to resize images.
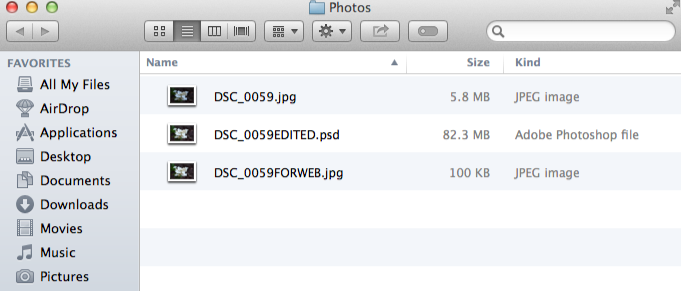
In the image below, you lot can meet three different versions of an image file: the original JPEG file, an edited PSD version, and a final JPEG version that'south been resized and saved for the Web. You tin run across that the Web version has a much smaller file size than the original and PSD versions.
Ultimately, the saving option you lot choose will depend on what y'all demand to do with the image. Let's have a look at a couple of scenarios to see why yous might choose different saving options.
Scenario ane
Permit'southward say you're asked to create a new header image for a visitor website. You've been given a photo to include, and y'all demand to add some text with the visitor name. Because you'll probable edit and revise this type of project, you'll want to save it as a PSD file. This mode, you can hands proceed editing the file later on. And because it volition eventually be posted online, you lot'll also desire to utilise Save for Web to create a new JPEG version of the finished image.
Scenario ii
Let's say you're planning to share some photos from a recent vacation with your friends. You lot'd but like to brand some quick adjustments in Photoshop, like cropping and rotating, before sharing them. In this case, you could open up the original image files in Photoshop, brand the necessary adjustments, then save a new version of the edited photos every bit JPEGs. Because none of these edits are too complicated, you probably don't need to relieve a divide PSD version of each prototype.
Equally you can see, the saving option you choose will vary from project to project. Earlier saving an image, accept a moment to consider the type of files y'all'll need. Every bit you commencement to gain more feel with Photoshop, this procedure will begin to experience quick and natural.
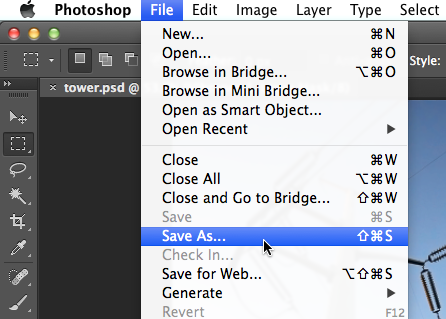
Using Save Equally
You'll use the Save As command to save files in the PSD format, as well as other common formats like JPEG and PNG.
To salve a file with Save As:
- With the image open up in Photoshop, select File > Relieve As.
- A dialog box will announced. Type the desired file name, and then choose a location for the file. You'll want to use a new file name to avoid accidentally overwriting the original file.
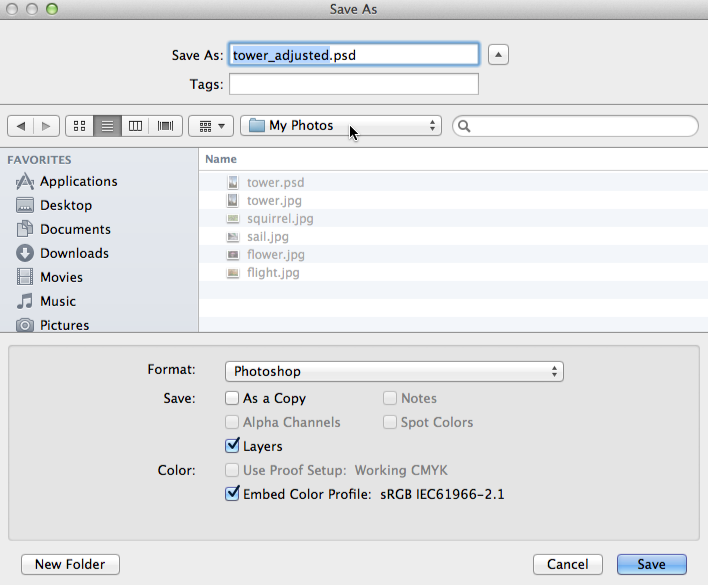
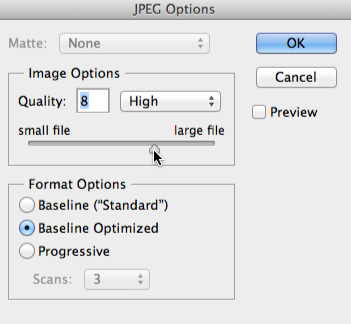
- Click the Format menu, then choose the desired file format. In our example, we'll save this image as a JPEG file. If you lot're saving as a PSD file, make certain the Layers option is checked. However, most other formats won't let y'all to select this option.
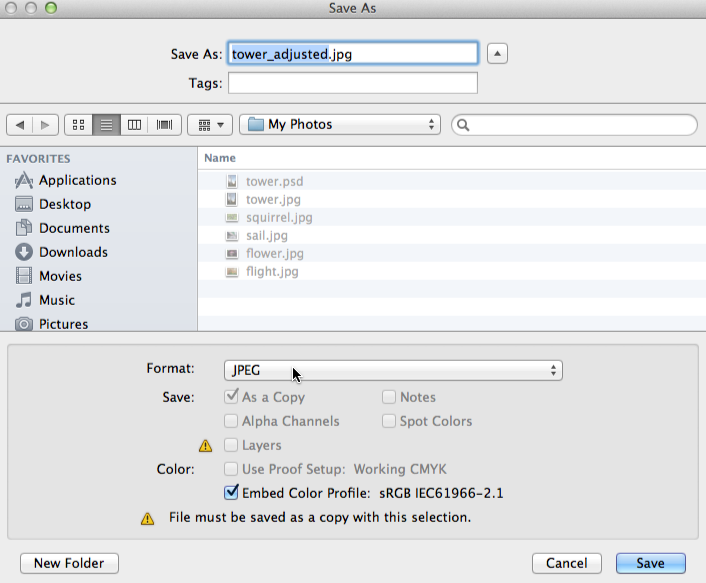
- Click Salve.
- Some file formats, such as JPEG and TIFF, will give you additional options when saving. Select the desired quality level, then click OK to save the image.
If you've already saved your projection equally a PSD file, y'all tin can select File >Relieve or press Ctrl+S (or Command+S on a Mac) to save your progress at whatsoever fourth dimension. Notwithstanding, if yous're working with another format like JPEG, we recommend using Save Every bit to avoid overwriting your original file.
Attempt this!
Open the example file in Photoshop and attempt saving it in different file formats, like PSD and JPEG. Notice how the PSD format preserves the private layers, while the JPEG format does not.
Using Save for Web
When you utilise the Save for Spider web feature, you'll need to make a few decisions well-nigh the image you're saving:
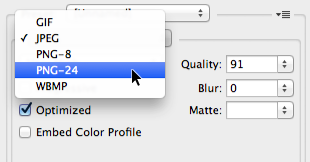
- File format: Salvage for Spider web allows you to choose from a few Web-safe file formats. Well-nigh of the time, y'all'll use the JPEG format for photographs. PNG-24 volition proceed the full quality of the paradigm, whereas PNG-viii is mainly used for graphics and illustrations that utilise just a few colors. By and large, you won't need to use the GIF or WBMP formats.
- Paradigm size: You tin can resize the prototype straight from the Salvage for Web dialog box. Resizing the image to exist smaller volition also reduce the file size. However, if you're using a service like Facebook or Tumblr, you probably won't need to resize your images because these services resize them automatically.

- Quality: If you're using the JPEG format, the image can be saved at unlike quality levels. You lot may desire to experiment with different settings to find the all-time balance between quality and file size.

Effort this!
Drag the slider in the interactive below to adjust the JPEG pinch quality. Call up, higher quality levels will as well increment the file size. Try to observe a setting that looks good while keeping the file size relatively small-scale.
For all-time results, we recommend using the Chrome web browser with these interactives.
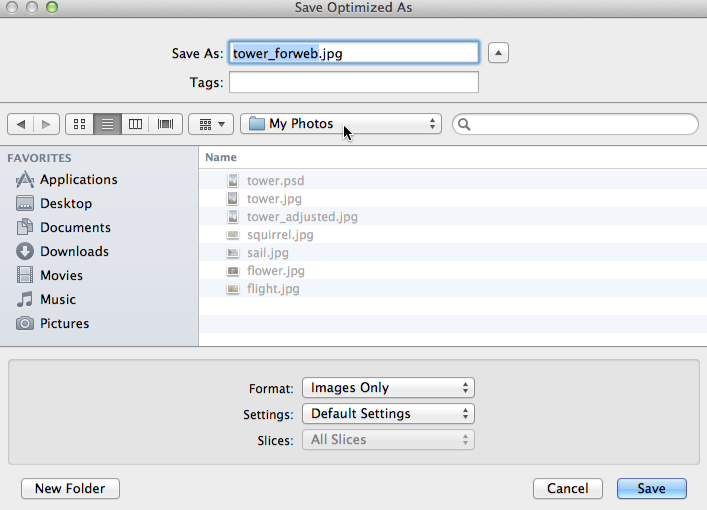
To save for the Web:
- Select File > Salvage for Web.

- The Salve for Web dialog box volition announced. Select the desired file type and quality level.
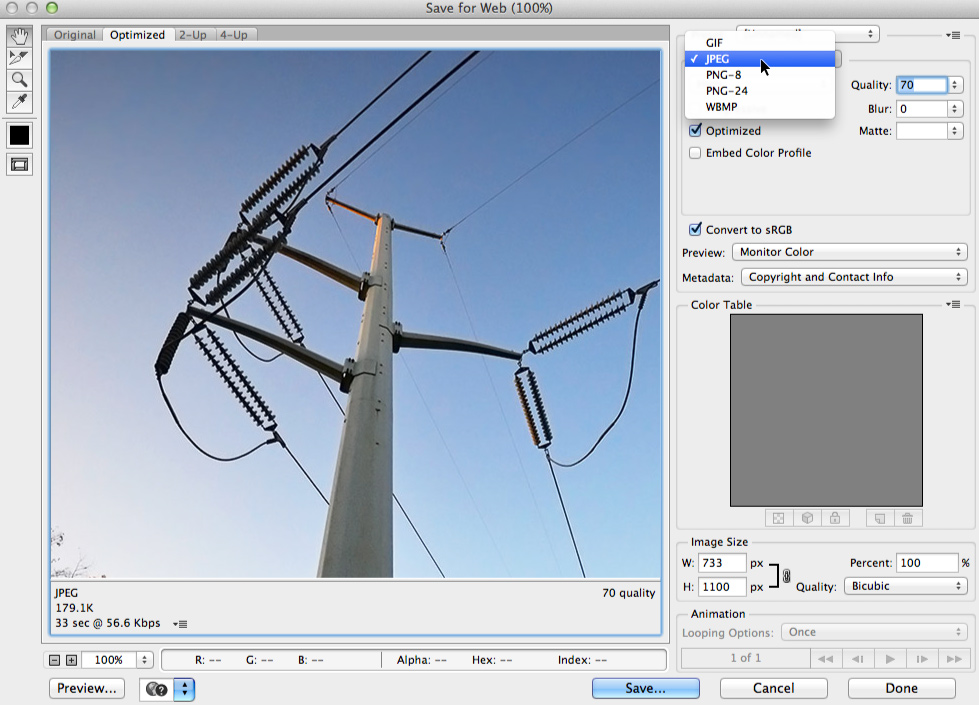
- If needed, resize the prototype by typing the desired dimensions under Image Size. When you enter the new image width, the peak should exist adjusted automatically to maintain the original aspect ratio.
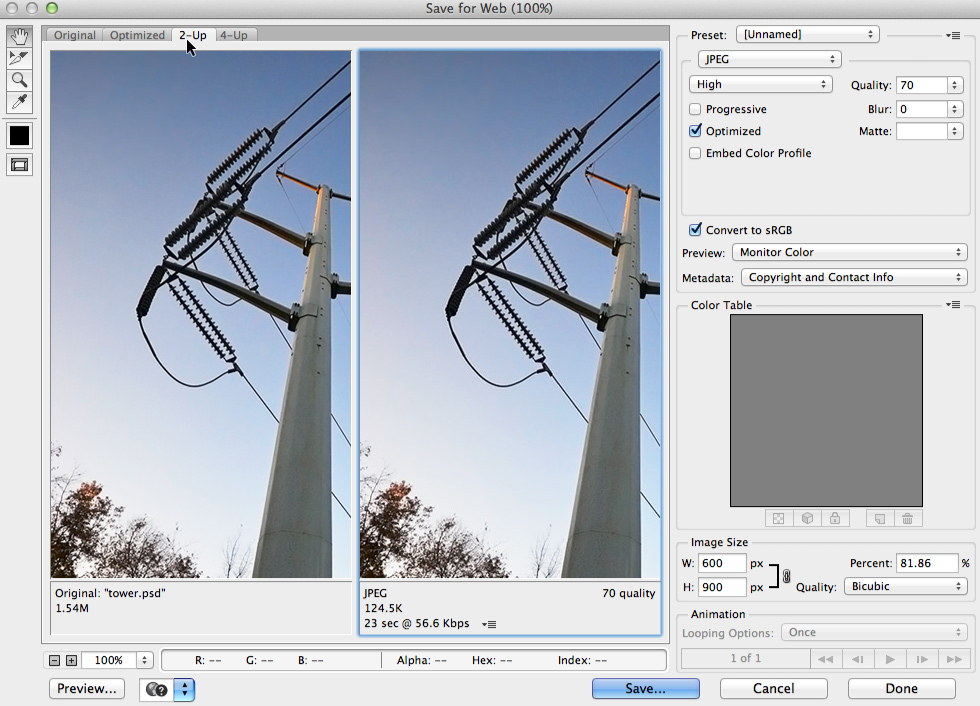
- If you desire, you can apply the 2-Upwards view to compare the original image with a preview of the new version. This is an easy fashion to brand sure you haven't lost too much quality from the original version. Note the file size in the bottom-left corner of each preview window.
- Click Save. A new dialog box will appear. Blazon the desired file proper noun and choose a location for the file, then click Save. Yous'll want to use a new file name to avoid accidentally overwriting the original file.
Try this!
Open up the example file in Photoshop and apply Save for Web to salvage a new version of the image. Try out unlike file formats and quality settings to run into how they impact the paradigm'due south quality and file size.
/en/photoshopbasics/understanding-layers/content/
Source: https://edu.gcfglobal.org/en/photoshopbasics/saving-images/1/
0 Response to "Save Selection to Use Again Photoshp"
Post a Comment